Click on "Enroll Patient" from the Main Menu. 
Enter the patient's registry number. This alpha-numeric field is a unique identifier for your patient. If AviTracks is getting the demographic information from an external source (EMR or CDR) this number should be the same as in your main system. Note: If you belong to multiple care units a screen will pop-up asking you in which one you want to enroll the patient.
DEMOGRAPHIC INFORMATION
The first screen you will see contains the patient's main demographic information.
In AviTracks you have the option to enter a secondary address for each patient. You can use this secondary address for patients that move during winter months. Just enter the information and let the application know which should it use as the main address (where letter would be send).
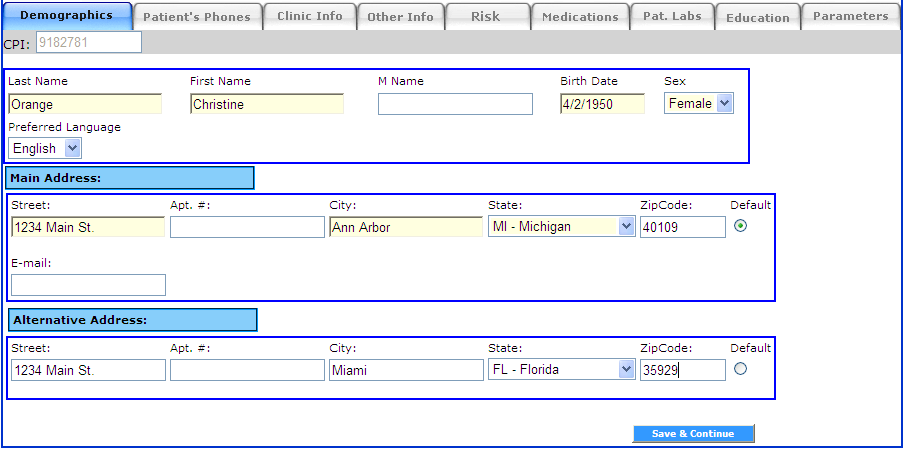
Review information and click on: "Save & Continue"
PHONE INFORMATION
The next screen will manage the patient phone numbers. In AviTracks you can enter as many phone number as you wish to do so follow these steps:
On the Yellow field enter the desired information.
Click on "Add New". This will put the new information on the Patient file
If you want to reorder the phone list just "grab" the record (by clicking and holding the blue square  on the left) and dragging the record to the desire position.
To modify a previously entered information just click on the "Edit" link alongside the record you want to change. Make the change and press "Save".
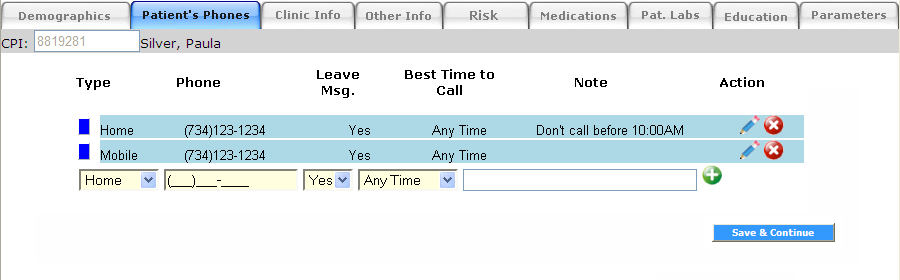 After you are done click on: "Save & Continue"
CLINIC INFORMATION
In this screen specific clinic information should be entered.
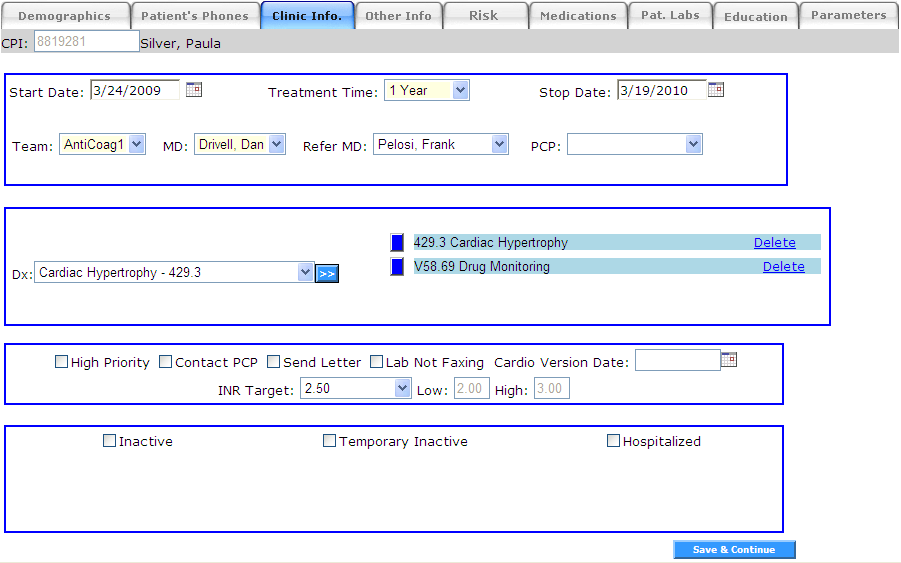 Start Date (mandatory): This is the date when you enroll the patient or the patient started treatment.
- Duration of Treatment, for how long you expect to care for the patient (unknown and indefinite are options, in those cases the Stop Date will be left empty).
- Stop Date (optional): This field will be filled automatically if you selected a Duration of Treatment. It can be overwritten manually. The data on this field will trigger the Renewal of Orders (if your system was configure for Renewal of Orders).
- Team (mandatory): Select the team that the new patient will belong to.
- MD (mandatory): Select the Physician in charge of the patient.
- Refer MD (optional): Choose the referring physician. Depending on the configuration of your system, this information will be use to send e-mails regarding the patient status in your unit as well as send Renewal of Order. If the Referring physician you are looking for is not in the list you can add a new one through the Maintenance Menu.
- PCP (optional): You can also keep track of the patient PCP (if different from the Refer MD). If the Primary Care Physician you are looking for is not in the list you can add a new one through the Maintenance Menu.
- Dx (optional): You can enter as many diagnosis codes as you wish (AviTracks used ICD-9 codes).
To enter a new Diagnosis code just choose one from the list (you can start typing the diagnosis code description until you get the one you are looking for).
Press the  button to add the selected diagnosis to the patient file.
Repeat this process until you added all the diagnosis codes for the patient.
- Flags (optional): Depending on the configuration of your system you will see different flags that can be turn off or on just by checking or unchecking the desired flag.
- High Priority: It will help you clinic identify STAT patients and will also apply the high priority protocols to the patient.
- Contact PCP: This flag will turn on automatically if the PCP wants to be contacted.
- Send Letter: Turn this flag on if the main way to communicate with the patient is via mail.
- Lab Not Faxing: This flag will make easy to identify labs that are not automatically sending the result to you and you need to call.
- Cardio Version Date: This is the date for this procedure. By entering a date on this field a new flag will be displayed along the patient in all list. Also, depending on the configuration of your system the protocol for this procedure will be applied.
- INR Target (optional): You can select from the pre-configure targets or choose Manual and enter the range manually. Only available with the Anticoagulation configuration.
- Inactive: Check this flag only if you want to disenroll the patient from you care unit.
When choosing this option you will have the opportunity to enter the date and reason.
- Hospitalized: Turn this flag on if the patient was hospitalized and your care unit does not take care of the patient while in the hospital.
You will have the opportunity to enter: Date of Hospitalization, Date of Discharge (presume), and Reason for hospitalization. The system will use the presume discharge date to remind you to check on the patient when that date is achieve.
- Temporary Inactive: As we the hospitalized flag this flag will let you turn off this patient for a predetermine amount of time. For example, if the patient was taken of the medication for a period of time and you don't need to follow the patient during that time. Once this flag is turn on you will have the option to enter: Date for beginning and end as well as a reason. The end date will be use to remind users that the patient needs to be reactivated.
After you are done press button: "Save & Continue"
OTHER INFORMATION
In this screen you will be able to add other information like: special notes, laboratories, pharmacies, allergies, and immunizations.
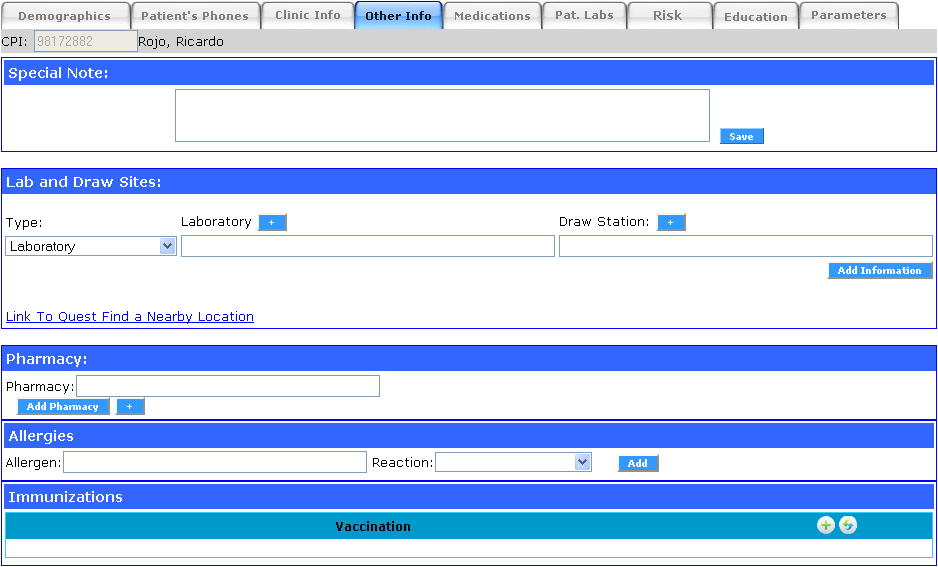
To add a draw site or lab the first step is to select the type from the drop down list (as you will see we have included most option, but you can always extend or contract the selection). If you decide to add a new lab choose "Laboratory" from the drop down list. Then start typing the lab name, phone or fax number. As soon as you type three character the system will display a list of labs that match, keep typing and the list will get shorter. Once you see the lab your are looking for select it from the list. If this lab has draw station and you want to indicate which draw station is going to be used by the patient proceed to the next bow (labeled Draw Station). This box work exactly the same way as the previous, and will only show draw station belonging to the selected laboratory.
Pharmacy: It works exactly the same way at the draw information with the added benefit that you can also entered the address of the pharmacy to start obtaining results.
RISK PROFILE
Depending on the configuration of your system you will be able to create risk profiles for each patient. The risk profiles can be link to the protocols follow by you clinic to take care of patients. Click on the link for more information on Risk Profiles
MEDICATIONS
To facilitate the management of medications AviTracks counts with 4 ways to manage patient medications. Depending of your unit configuration your might or not have access to all types. To get access to the medication section just click on the Medication tab.
- Level-1: Medication that need to be follow intensively. It is required to know the amount as well as the number of pills the patient is taking every day. A good example of these kind of medication is: warfarin.
- Level-2: Medications manage by you unit. Detailed information about the medication is required. Example: Immunosuppressive drugs.
- Level-3: Other medications taken by the patient. Not necessarily manage by you care unit but information is needed to prevent dangerous interactions. Examples of these could be over the counter medications.
- Infusions: These type will allow you to start a round of infusion and pre-schedule all the pulses. Depending on you configuration you will be able to enter the dates for pre and/or post infusion draws. AviTracks will also link the correct labs to the infusions for easy identification and follow-up.
LEVEL-1 MEDICATIONS
To get to this screen click on the medication tab (from the patient main screen).
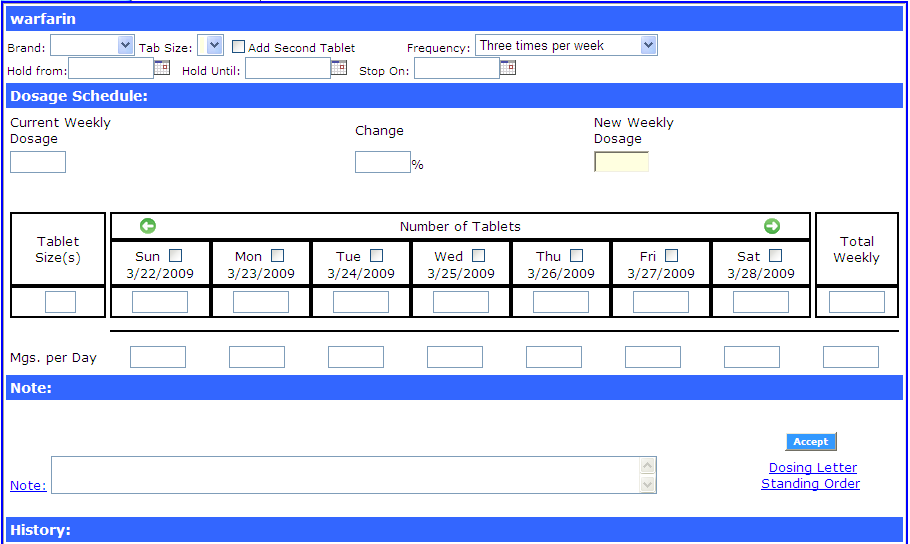
This is the screen were you can add information to Level-1 medication (Warfarin).
Only the first time you enter information for a patient you will have to provide the following information:
- Brand: Select from the drop down list the brand the patient is taking or choose generic (if applicable).
- Tab Size: Select the Tab Size taken by the patient.
- If the patient is taking a second pill click on "Add Second Pill"
- This will open a secondary field for you to enter the secondary pill size.
- Make sure to always use the first size to entered the biggest pill and the second for the smallest pill.
- Enter frequency
After the initial dosage, the system will display the existing information by default. So, you wont need to change any of the information unless there is a change.
At any point you can also enter information like:
- Hold From: To indicate that the patient is holding on the medication from a specific date.
- Hold Until: To indicate that the patient is re-starting the medication on this date.
- Stop On: This will prompt the user to stop the medication when this date is achieve.
- For more information on how this information is use in AviTracks go to: Reminder List
First Dosage Schedule:
- Current Weekly Dosage: This information will be empty as the patient does not have any existing dosage.
- Change: This information will be empty. Do not enter information here at this time.
- New Weekly Dosage: Enter the weekly milligram dosage you want to start the patient.
- As soon as you do that the application will try to accommodate the weekly dosage with the selected pill(s) size.
- The application will automatically recommend the distribution along the week.
- You can always overwrite the application recommendations. It will automatically adjust the total weekly milligrams as you change the dosage each day.
- The application will show the number of pills every day as well as the total dosage per day.
- Once you finished you can enter a note (which will be attache to the newly create schedule)
- And finally click on "Process" button.
- Depending on the configuration of your site you could print the "Dosing Letter" as well as the "Standing Order" from this page.
LEVEL-2 MEDICATIONS

- To add a new medication just select the medication from the drop down list.
- Press the "Add/Change" button
- This will open this medication detail information.
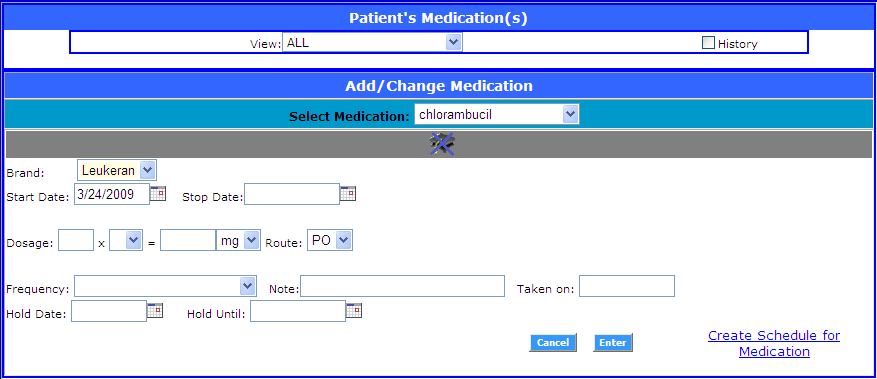 Enter the detail information for this medication:
- Brand
- Start Date (optional): This information will be use to start the protocol for the medication.
- Stop Date (optional): If desire a future date can be entered. The application will remind you when it is time to stop the medication. If a date in the past is entered the medication will be stopped automatically.
- Dosage (optional): Enter the dosage information.
- Hold Date (optional): If a date in the future is entered the AviTracks will remind you to call the patient to stop the medication.
- Hold Until (optional): If a date in the future is entered AviTracks will remind you to re-start the medication.
- At this point you can also create a schedule for the dosage of the medication. For detail go to Medication Dosage Schedule.
- If the medication was configure to give education to the patient a graduation hat (with a blue cross) will show up above.
- Click on the hat to open the education page and confirm that the education was given to the patient.
- Once you do that the graduation hat will show up without the blue cross (indication that the education was completed).
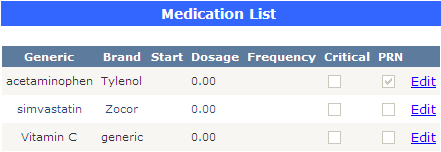
Confirm all the information and press "Enter". That will move the newly entered information to a grid at the top of this page (as shown on the figure below).

This grid will contain all Active medications (on your care unit). You can choose to see only active medications (by default) or the history of any or all medication by checking the "History" check box and choosing a specific medication from the "View:" drop down list.
To modify an existing medication you can:
- Select the medication you wish to modify from the grid. That will bring the "Detail" information for this medication. You can overwrite any information and choose modify. The old information WILL NOT be lost. The system will automatically create a new record with the new information.
- As we did previously (when adding a new medication) you can choose the medication from the drop down list and enter the new information.
LEVEL-3 MEDICATIONS
As we mentioned before these are medication that you do not necessarily manage but are interested on as they can interact with the medications you manage.
 To add a new medication to the patient just start typing the medication you are looking for either by generic name or brand name.
If you want to add a new medication or supplement click on the header named: "Can't Find Medication". This will displayed the required field for you to add the new medication. See figure below:
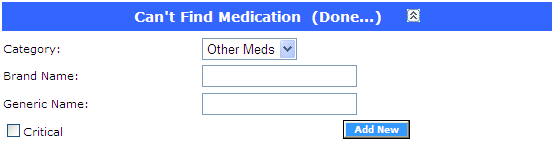
Once found the medication you want to add just click on the "Add" button. And the fields for adding more information will be displayed:
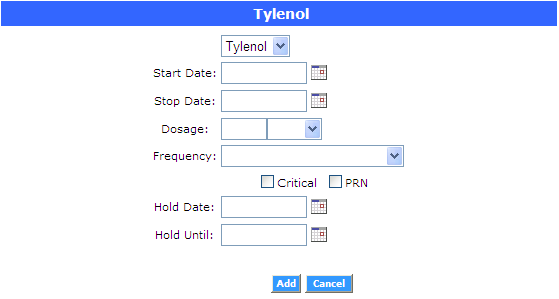 All fields for this class of medication are optional. So, you could just press "Add" to include this medication to the patient's record or fill as many information as you want to keep for your records. Once you start adding medications to the patient a grid with all medications will appear on this screen.
INFUSIONS
On the first screen of the infusion section you will see at the top all the infusions manage by your care unit (diplayed on a drop down list). If your care unit manages only one infusion the that one will be displayed by default.

Single Infusion Sample
 Multiple Infusion Sample
On the first case select the infusion you wish (if the infusion needs BMI or Weight to calculate dosage the system will present the corresponding fields) then:
- Click on start round. If the infusion has a protocol attached to it a screen will pop-up asking to confirm or cancel the protocol.
- If required enter the weight and/or height information and click on the "Update" button.
- Then click on "New Pulse" button.
- At any point you can click on the graduation hat to access the education screen for this infusion and complete it.

- That will display all the fields to enter the Pulse information.
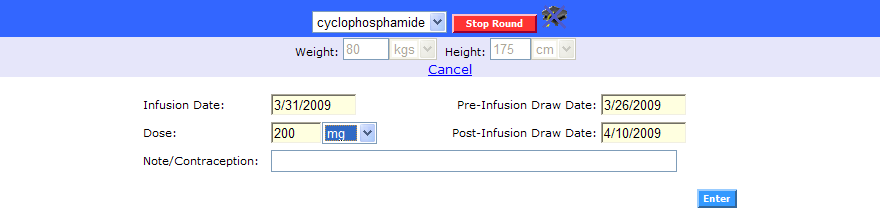 Entered the required fields. This will depend on the configuration of the selected infusion.
- Click on "Enter".
- If you wish to cancel, just click on the "Cancel" link at the top.
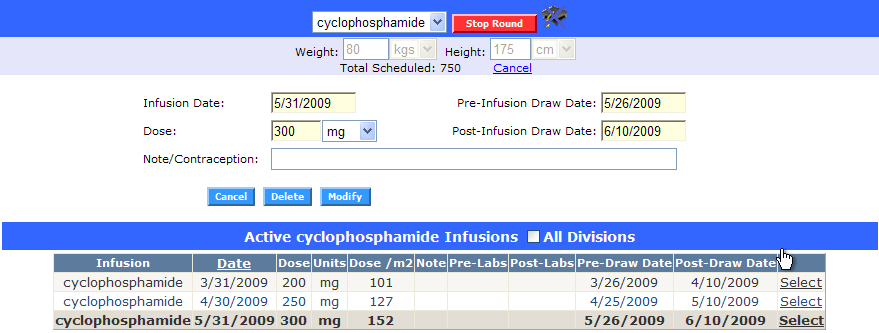
- As you enter the pulse information the detail is will be display on a grid. Make sure the information is right, if you want to make any change click on the "Select" link along side the pulse you want to modify.
- That will bring the pulse information up to the editable fields where you will be able to make any changes or delete the pulse (see image below).
- As you work on with the application the Pre-Labs and Post-Labs information will be filled automatically as you review the corresponding labs.
- In the event where the patient went to the lab ahead of time (or it was late) and the application did not recognized those labs you can manually assign those labs as pre or post labs for the right infusion.
- To do that just select the pulse you wish to attach new labs to and click on the corresponding button "Add Pre-Labs" or "Add Post-Labs".
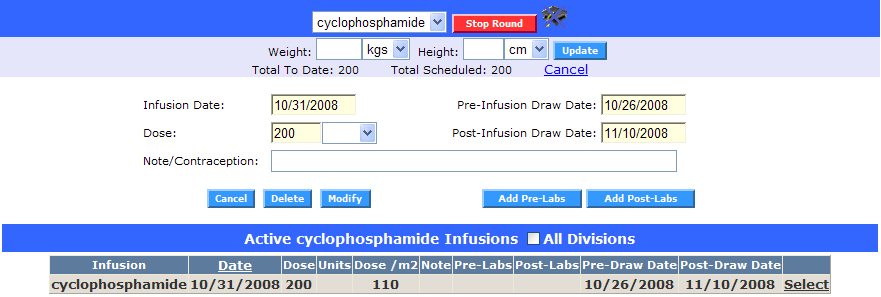
- This action will bring up a new screen with the list of all labs. Just select the lab you want to link as pre or post labs.
PATIENT LABS (HEALTH MAINTENANCE)
In this section you can build the patient's test(s) that you want. If your unit configured protocol you might be able to skip over this section as it will be filled automatically using the specific protocols.
But even if protocol exist you might want to edit it to add new tests or change the frequency.
- The first step is to enter the frequency you desire for the set of labs you are about to add.
- Then you just need to click on the test(s) you want. The tests showing up in this section will depend on the care unit configuration.
- Assign the initial draw date for this set of test.
- Finally, press "Enter".
- If you want to enter multiple schedule (some tests should be perform monthly while others should be perform twice a week). Just start over the process, staring by selecting the new frequency.
If the patient already has test on file this page will show the lowest frequency by default.
At the bottom of the page there is a link to print the Standing Order right away.
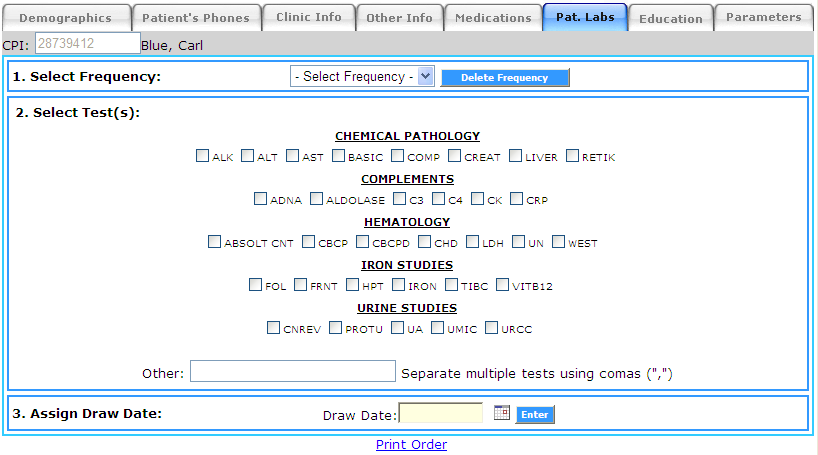 If you need to select certain patient's frequency just choose the frequency you want to delete from the drop down list and press "Delete Frequency".
EDUCATION
Depending of your care unit you will see the Education page that is appropriate for your patients.
Just go through the list at the end remember to click Education Complete.
PARAMETERS
This section is used to select a specific value range for a test. This will help the application determine the level of priority of the laboratory results.
There are three priority levels for labs results:
- Normal: All tests are within normal range.
- Medium: Some tests are outside the normal range. (it shows in cream in the labs to be review list)
- High: At least one test is outside the patient's parameters. (it shows in red in the labs to be review list)
Entering the information:
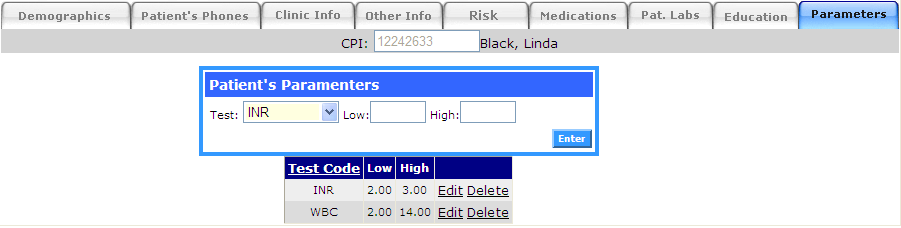
- Choose a test (from the drop down list) you want to add a parameter to.
- Enter the Low and High values. If the result falls outside this parameters the lab result will be marked High priority.